Integration Protocol (AMX, Lutron, Crestron, Control4, Clipsal)
TapHome system is able to integrate with other systems through simple ASCII integration protocol. This enables other systems to get information and control TapHome devices.
TapHome system is able to integrate with other systems through simple ASCII integration protocol. This enables other systems to get information and control TapHome devices.
Supported communication layers
- RS485
- TCP/IP
- UDP/IP
Protocol description
Protocol supports following commands:
HELP, LIST, GET, SET, ACTION, HEADER, AUTOSEND
Every command must be terminated with CRLF (0x0D 0x0A, \r\n) characters.
Command HELP
Command HELP will display basic information about supported commands.
HEADER [ON/OFF] switch header information on or off.
LIST display all exposed devices.
GET [ID] get device with ID values.
SET [ID ST VAL1 .. VALN] set device with ID status ST and values VAL1 to VALN.
ACTION [ID NUM VAL] Perform on device with ID action number NUM with value VAL.
PUSHALL [ON/OFF] switch push all devices change on or off.
Command HEADER
Command HEADER switch between two possible data output. If header is ON there are send description information together with data. In case header is off it are send only data.
HEADER without parameters send information about actual switch state.
HEADER ON will switch on header information.
HEADER OFF will switch off header information.
Command LIST
Command LIST displays all exposed devices.
Displayed are following information:
Device ID is numerical device ID.
Device Type is text description of device type (Blind, Switch, …).
Device Name as set in TapHome system.
Device Status as text information
LIST command example output:
| |
Command GET
Command GET need one parameter - device ID. It returns device status and values as numbers.
Example output of command GET 137
| |
Example when header is off:
| |
Command SET
Command SET need at least three parameters. First it is device ID, then new device status to be set and then at least one value to be set. For devices with more than one value all values should follow - for example blind require both parameters to be send - new level and new angle.
Example of output of command SET 137 0 35 80 with and then without header information:
| |
Command ACTION
Command ACTION will execute action on device ID with send value. Actions are defined only for blinds. There are three actions number for blinds:
0 blind stop
1 adjust level from actual position +-value
2 adjust blind angle from actual position +-value
Example output of command ACTION 137 1 -20:
| |
Command PUSHALL
Command PUSHALL will enable sending of all devices changes. Information are send in same format as response to command GET. Please note that when used on RS485 line there can be possible conflict on the bus which resolve to data mismatch. So we suggest to use this command only in full duplex lines / like RS232 or RS422. There is possible to switch it on also on RS485 line in systems where no SET command or ACTION commands will be used - this means only in monitoring systems. In RS485 lines where it is required SET and ACTION commands we suggest to use periodic pooling through command GET instead of automatic monitoring.
Address mode
When unique interface ID is set, than it is possible to use all command in address mode. In this mode the address header proceeding the command itself. Address headers is sequence!InterfaceID: where InterfaceID is set in interface configuration. Each answer line is than also proceeded with the same header. Only interface with correct address will answer - incorrect addressing can not be recognized by answer.
Example of address mode request with command !2:LIST:
| |
Configuration
For exposing devices in Integration protocol first go to Expose devices and choose Add new interface. From offered interfaces choose one of Integration protocol RS485, Integration protocol TCP or Integration protocol UDP:
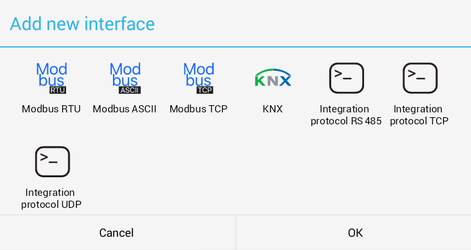
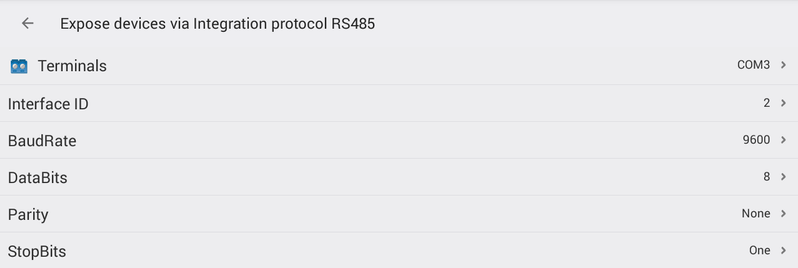
After adding interface according to type fill other parameters. Set unique Interface ID for each interface if you want to use address mode.
Choose terminal for communication and fill communication parameters for RS485. Set all serial line parameters as required by connected client.
Set TCP port of slave interface:

Set UDP port of slave interface:

Then use Add device to add your devices in the exposed devices:

Choose device from list of offered devices. Please note that already added devices are shadowed.
After adding device it is displayed in list of devices for Integration protocol interface:

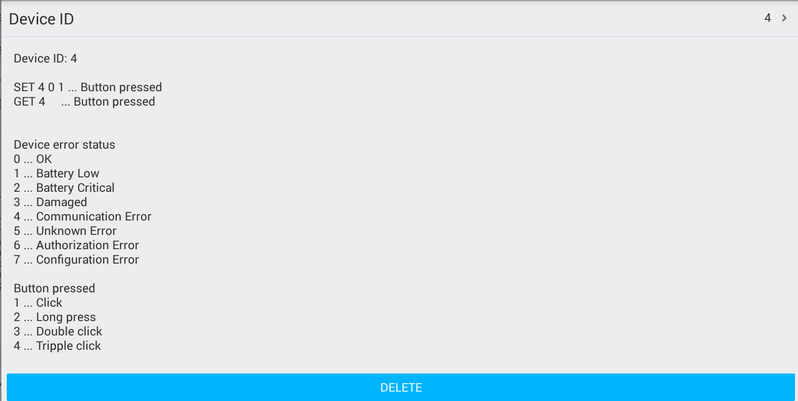
Click on device to display information about it, change automatically generated device ID, or delete device from exposed devices.
Supported devices
Following devices are now supported for exposing in Integration protocol:
Thermostat, Switch, Multi-value Switch, Push button, Reed Contact, Dimmer / Analog output, Variable, Blind, RGB Light.
| Device type | Write commands | Read commands |
|---|---|---|
| Thermostat | SET <DEVICE_ID> E.g. “SET 1 0 24.5” Sets thermostat with ID=1 to no error, set point 24.5ºC | GET <DEVICE_ID> Response: Set point | Temperature | Humidity E.g. “GET 1” |
| Switch | SET <DEVICE_ID> E.g. “SET 1 0 1” Turns on switch with ID=1. No error state. | GET <DEVICE_ID> Response: Switch state (0 or 1) |
| Multi-value Switch | SET <DEVICE_ID> E.g. “SET 1 0 3” Sets multi-value switch with ID=1 to value 3. No error state. | GET <DEVICE_ID> Response: Value |
| Push button | SET <DEVICE_ID> E.g. “SET 1 0 1” Simulates short press of push button with ID=1. No error state. | GET <DEVICE_ID> Response: BUTTON_PRESSED (1 .. 4) |
| Reed contact | not available | GET <DEVICE_ID> Response: State (0 or 1) |
| Dimmer / Analog output | SET <DEVICE_ID> E.g. “SET 1 0 55.5” Sets dimmer with ID=1 to value 55,5%. No error state. | GET <DEVICE_ID> Response: Analog output value (DDD.D) |
| Variable | SET <DEVICE_ID> E.g. “SET 1 0 1234.5” Sets variable with ID=1 to value 1234.5. No error state. | GET <DEVICE_ID> Response: Variable value (VVV.V) |
| RGB Light | SET <DEVICE_ID> E.g. “SET 1 0 180 100 50” Sets RGB light with ID=1 to cyan color, full saturation, 50% brithtness. No error state. | GET <DEVICE_ID> Response: Hue | Saturation | Brightness |
| Blind | SET <DEVICE_ID> LLL … Blinds level AAA … Slats angle E.g. “SET 1 0 100 50” Sets blind with ID=1 to level 100%, with 50% angle of slats. ACTION <DEVICE_ID> 1 <+/->LLL E.g. “SET 1 1 -10” Moves blind 10% up ACTION <DEVICE_ID> 2 <+/-> AAA E.g. “SET 1 2 +25” Set angle of slats to +25% (direction down). ACTION <DEVICE_ID> 0 Stop blinds | GET <DEVICE_ID> Response: Level | Angle |
| Blind group | Same as Blind, with without support for Action 0 (Stop). | |
| Slide, Slide group | not supported | not supported |
| Alarm, Electric meter, Slide group, Brightness sensor, Impulse counter | not supported | not supported |
DEVICE_ID
Incrementally assigned to every device in expose devices list. Can be changed manually to any value.
ERROR
0 … OK
1 … Battery Low
2 … Battery Critical
3 … Damaged
4 … Communication Error
5 … Unknown Error
6 … Authorization Error
7 … Configuration Error
BUTTON PRESSED
1 … Short press
2 … Long press
3 … Double press
4 … Triple press
Debugging RS485 communication
For RS485 connections, it is possible to connect USB RS485 adapter to your PC. Requests and responses will be visible in console application.
Standard USB to RS485 converter
http://sk.farnell.com/ftdi/usb-rs485-we-1800-bt/cable-usb-rs485-serial-converter/dp/1740357
Note: this converter is not galvanically isolated, so you should connect GND of the converter with GND of Core.
Terminal software for Windows
HTerm: http://www.der-hammer.info/terminal/
How to set HTerm terminal
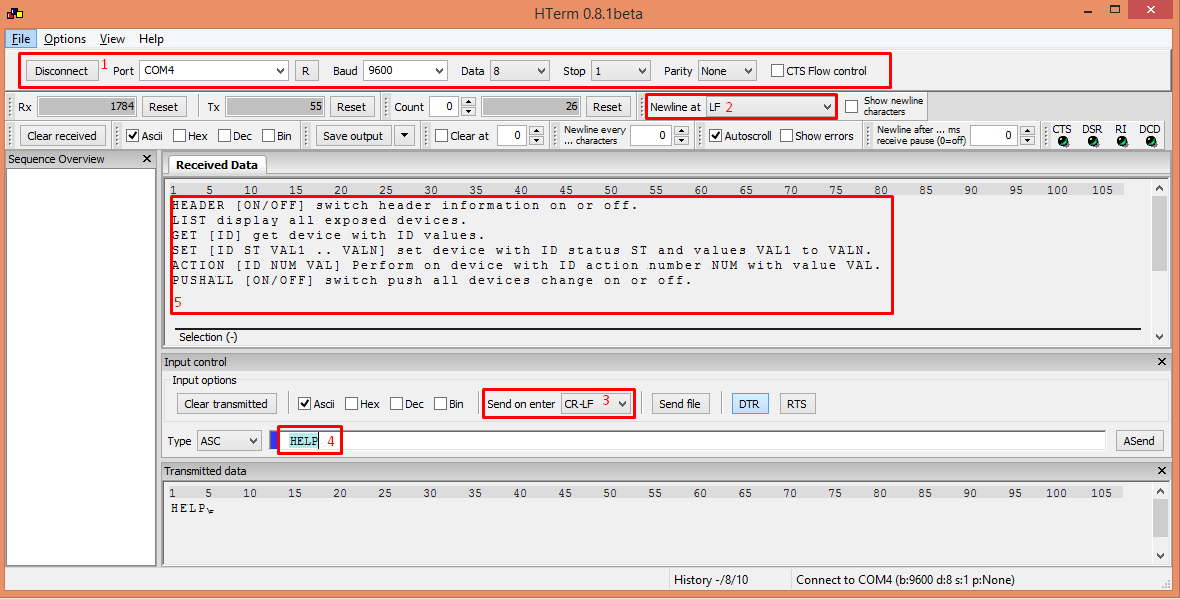
- Set correct connection properties to match settings in TapHome Integration Protocol interface. (Note that default baud rate is 9600)
- Set New line at LF character
- Set Send on enter: CR-LF
- Type command (e.g. “HELP”)
- Read the response
Note: If you want to see changes of TapHome devices in the console, use PUSHALL ON command.
Debugging TCP communication
For debugging TCP communication it is possible to use putty (https://putty.org/) terminal. Please use following settings for TCP connection:
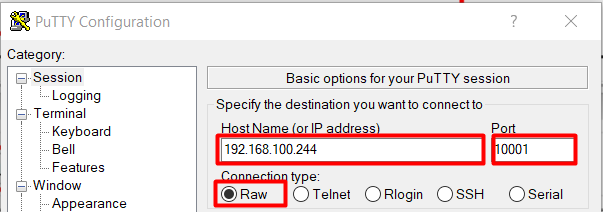
First set the Connection type to Raw, then fill the IP address of Core and port set in exposed TCP Integration protocol settings.