
Light Controller
🚀 Available since Core version 2026.1.
The Light Controller smart rule controls one or more lights using push buttons and sensors in a single rule. A button turns the lights on or off or dims them, a motion sensor turns them on, and a presence sensor keeps them on while someone is in the room. A manual button press temporarily overrides the sensors. This prevents the automation from undoing your manual action — for example, if you have just turned off the light, the motion sensor will not turn it right back on.
How the Light Controller works
The smart rule controls the lights in three ways, each with its own section on the smart rule page:
- Control Buttons — a short press turns the lights on or off, holding a button dims them. For toggle buttons, the master light determines the direction.
- Automatic Turn On — when any sensor becomes active, the lights turn on and stay on while it is active. If the Automatic Turn Off section has no sensor, For a specified time determines how long they stay on after the activity ends.
- Automatic Turn Off — when this section has a sensor, it decides when the lights turn off: the Turn-off Delay starts once neither a turn-on nor a turn-off sensor is active, and when it expires, the lights turn off.
By default, the override after a manual turn-on lasts until you turn the lights off with a button, and the override after a manual turn-off lasts 1 minute — so by default, the sensors do not turn off lights that were turned on with a button.
The automation does not turn the lights off with a command: when the duration timer (For a specified time) or the Turn-off Delay expires, the smart rule releases the lights to automatic control — they return to their Default values, or another smart rule takes them over. A new light has its Default values set to Do not change and stays on after it is released. For the automation to turn the lights off, set the Default values row of each light to Set to value 0% in the light’s detail.
 Do not changeLast manual valueSet to value
Examples and scenarios
The lights in the examples have their Default values set to 0%, and each configuration lists only the settings that differ from the defaults.
Living room with multiple lights: dimming control
Goal: A single wall switch controls the ceiling light and two floor lamps. Short press toggles all three to their last brightness, long press dims them together. No automation — buttons only.
Configuration:
- Lights: ceiling light (master), floor lamp left, floor lamp right
- Control Buttons: wall switch (Toggle)
- Configure: Toggle Between: 0% and… Last Value; Minimum Value 15%
Bedroom with separate raise/lower switches
Goal: Two wall switches near the bed — one for raising, one for lowering. Short press is disabled entirely to avoid accidental toggles at night.
Configuration:
- Lights: bedside lamp
- Control Buttons: left switch (Turn on), right switch (Turn off)
- Configure: Short Press — Enabled Off; On Long Press Fade Time 0→100% 8 s; Minimum Value 5%
Staircase with custom button actions: color scenes
Goal: The staircase LED strip is controlled by a wall switch and, at night, by a motion sensor. A double click on a smart button activates a warm color scene, a triple click turns the strip off.
Configuration:
- Lights: staircase LED strip
- Control Buttons: wall switch (Toggle)
- Set Custom Actions: smart button — Short press action: No action, Double click action: Custom Actions, Triple click action: Turn off; Execute Action: set LED strip to warm white color, 40% brightness
- Automatic Turn On: staircase motion sensor; Value 60%; Configure: from 20:00 to 07:00 (Time)
- Automatic Turn Off: the same motion sensor; Turn-off Delay 2 minutes
- Override Automatic Control With a Button: after a turn-on, For a fixed time 15 minutes; after a turn-off, 2 minutes
Behavior: Only custom actions can set both color and brightness. The wall switch, as well as a double or triple click on the smart button, suppresses the motion sensor; a short press on the smart button does not. During the day, the sensor does not turn the strip on, but it does turn off a strip that was turned on with the wall switch — at the earliest once the override ends and 2 minutes after the last motion.
Bathroom with brightness sensor: only when dark
Goal: The bathroom light turns on when the door opens, but only when it is dark, and stays on while someone is inside.
Configuration:
- Lights: bathroom ceiling light
- Control Buttons: bathroom wall switch (Toggle)
- Automatic Turn On: door reed contact; Value 100%; Configure: time condition off, bathroom brightness sensor, Brightness Is Less Than 40%
- Automatic Turn Off: the Presence signal of the bathroom presence sensor; Turn-off Delay 1 minute
- Override Automatic Control With a Button: after a turn-on, For a fixed time 30 minutes; after a turn-off, 5 minutes
Behavior: The light turns off 1 minute after neither Presence nor the reed contact is active — that is, about 11 minutes after the last motion, because Presence holds for 10 minutes.
Garage with custom auto-on actions and no turn-off sensor
Goal: A motion sensor turns on the main garage light to 80% and a workbench LED strip to 30%. The lights stay on for 10 minutes after the last detected motion, then turn off.
Configuration:
- Lights: garage ceiling light (master), workbench LED strip
- Control Buttons: garage wall switch (Toggle)
- Automatic Turn On: garage motion sensor; Custom Actions: garage ceiling light 80%, workbench LED strip 30%; Configure: time condition off
- For a specified time: 10 minutes
Getting started
The smart rule page has seven sections in this order:
 Add Device
 Add ButtonAdd SensorValueLast ValueCustom ActionsAdd SensorLast ValueValueSet brightness sensorUntil turned off with a buttonFor a fixed timeUntil turned on with a buttonFor a fixed time
- The lights the smart rule controls — see Lights.
- Buttons for turning on, turning off and dimming — see Control buttons.
- Buttons with custom actions, configured on a separate page — see Custom button actions.
- Sensors that turn the lights on; Configure restricts turning on to a time window and to darkness — see Automatic Turn On.
- What a turn-on sensor does and how long the lights stay on after it goes inactive; appears once section 4 has at least one sensor. The For a specified time row disappears when you add a sensor to section 6 — see Turn-on action and For a specified time.
- Sensors that decide when the lights turn off; with the first sensor, Turn-off Delay appears — see Automatic Turn Off.
- How long a button press suppresses the sensors — see Override automatic control with a button.
In the picture, click Configure, a button row or the Override Automatic Control With a Button row, and the window that the app opens for it appears on the right: the push button settings, the action type, the turn-on conditions and the override. The subsections below add their ranges and defaults.
When you add the smart rule from a device’s detail, the app pre-fills it: it adds a light to the Lights section as the master, a motion sensor or reed contact to Automatic Turn On, the Presence signal of a presence sensor to Automatic Turn Off, a push button to Control Buttons as Toggle, and a brightness sensor to the turn-on restriction. If the device is in a zone, the app also adds, from the same zone, the lights, the brightness sensor, the Motion signal for turning on and the Presence signal for turning off; it does not add Alarm — see Presence sensor.
Basic example
You want a wall switch to toggle the hallway light, with a motion sensor to turn it on automatically at night.
- In the detail of the hallway light, set Default values to Set to value 0% so that the automation can turn it off.
- Create a new Light Controller smart rule.
- In the Lights section, tap Add Device and select the hallway light.
- In the Control Buttons section, tap Add Button and select the wall switch. In the Action type dialog, choose Toggle.
- In the Automatic Turn On section, tap Add Sensor and select the motion sensor. By default, the sensor turns the light on to 80% within the active time window (sunset to sunrise).
- In the Settings section, tap Override Automatic Control With a Button and set “When light is turned on with a button, override automatic control…” to For a fixed time (for example, 5 minutes).
- Tap Save.
At night, the motion sensor turns the light on, and after 5 minutes with no motion (the default value of For a specified time), the light turns off. Without step 6, after you turn the light on with the switch, the motion sensor would stay suppressed until you press the switch again to turn the light off.
Lights
Tap Add Device to select one or more lights. You can add dimmable lights, color lights, simple on/off switches and multi-value switches. Short press and long press set all lights at once.
Master light
The master light determines the direction of toggle buttons (Short press) and of the Toggle action of a custom button.
The first light added is automatically set as master and carries the “Master” label in the list. To change the master, open the menu of another light and select “Master”. When you remove the master light, the first light in the list becomes the master. Set the master to the light that best represents the overall group state.
Control buttons
Tap Add Button to add one or more push button devices and choose the button type in the Action type dialog; you can change it later in the menu of the button row:
| Button type | Short press | Long press (hold) |
|---|---|---|
| Turn on | Turns lights on | Raises the brightness |
| Turn off | Turns lights off | Lowers the brightness |
| Toggle | Turns lights on/off based on master light state | Raises or lowers (direction flips on each hold) |
Control buttons ignore double click and triple click — those belong to custom actions. A push button device can be assigned to either control buttons or custom actions, but not both.
If any push button device does not have long press enabled, a warning appears on the page. For TapHome and ZigBee push buttons that support it, the warning has a Fix this button that enables long press in the device’s hardware settings (if you are allowed to change the device).
Short press
A toggle button turns all lights on when the master light is fully off, and turns them off when it is fully on (100%). At partial brightness, it reverses the previous direction: if the last action raised the lights, short press turns them off, and vice versa. The lights turn on to Value or Last Value — see Push button settings.
Long press (hold)
Holding a button raises or lowers the lights smoothly; a full 0–100% sweep takes 5 seconds. Releasing the button stops the change at the current brightness. Toggle buttons alternate direction on each hold, except when continuing from the Minimum Value to zero.
How to read the static charts on this page: grey lanes show what the smart rule watches (bar = sensor active or button held, dot = short press); a sensor lane carries the name of its signal and, on the right, the section it is added to. Blue lanes show what the smart rule does and carry the names of the sections of its page (bar = lights on or override in effect). A striped bar is a timer counting down, and a dashed outline the rest of a timer that was cancelled. The time axis of these charts is not to scale, except for the dimming chart below: its axis is in seconds, the area under the line is the brightness of the master light, and the lane height is 0–100%. The chart shows a toggle button with the default settings:
- A short press with the master light off turns the lights on to 100%.
- Holding at 100% lowers the brightness.
- The brightness reaches Minimum Value (10%) and pauses, although the button is still held — this prevents accidentally turning the lights off when you only wanted to dim them.
- Holding again continues lowering to zero.
- Holding with the light off raises the brightness; releasing stops it at 60%.
- A short press at partial brightness after raising turns the lights off.
With multiple lights, lowering follows each light separately: a light below the Minimum Value goes straight to zero, and a light above it pauses at the Minimum Value when lowering continues to zero. An on/off switch turns on or off right at the start of the hold.
Push button settings
Tap Configure in the Control Buttons section to open the Configuration page with detailed button settings — the picture in Getting started shows what it looks like. The settings apply to all control buttons in the smart rule:
| Setting | Options | Default |
|---|---|---|
| Short Press — Enabled | On, Off | On |
| Toggle Between: 0% and… | Value 1–100% or Last Value (each light returns to its previous brightness) | Value (100%) |
| Fade Time 0→100% of short press | Immediately, 0.25 s, 1.5 s, 3 s, 5 s | 0.25 s |
| On Long Press — Fade Time 0→100% | 3 s and more | 5 s |
| Minimum Value | 0% up to 1% below the Value; with Last Value or with short press disabled, up to 99% | 10% |
When short press is disabled, the other two short press settings are hidden. If Minimum Value is set to 0%, the light goes straight to zero without pausing.
Custom button actions
Beyond the standard toggle and dimming behavior of control buttons, you can assign custom actions to specific push buttons — for example, a double click activates a color scene. Tap Set Custom Actions on the main page to open the configuration.
Adding a custom button
- Tap Add Button in the Buttons section and select one or more push button devices.
- In the dialog, choose an action for each press type. Short press action is always available; Long press action, Double click action and Triple click action only appear if all selected push button devices support them. By default, short press has Custom Actions and the other press types No action.
| Action | Effect |
|---|---|
| Custom Actions | Executes the custom actions list (defined below) |
| Turn off | Turns off the lights targeted by custom actions |
| Toggle | If the master light is on, turns off the lights targeted by custom actions. Otherwise, executes custom actions. |
| No action | Press type is ignored — it does not suppress the sensors either |
Custom actions list
The Execute Action section only appears when at least one button has Custom Actions or Toggle assigned to any of its press types. Tap Add New Action to add actions for specific lights of this smart rule — for example, set one light to 50% brightness while setting another to a specific color. Actions are available only for lights from the Lights section; when you remove a light from that section, its action disappears too.
Automatic Turn On
Tap Add Sensor to add motion sensors or reed contacts. When any selected sensor becomes active, the lights turn on and stay on while it is active.
Turn-on action
Below the sensors, choose what happens when a sensor triggers:
| Option | Effect |
|---|---|
| Value | All lights turn on to the same brightness, 1–100% (default: 80%) |
| Last Value | All lights return to their previous brightness |
| Custom Actions | Set Custom Actions opens a list of per-light actions — for example, set the ceiling light to 80% while setting the LED strip to 30% |
With custom actions, the automation controls only the lights that have an action in the list.
For a specified time
When the Automatic Turn Off section has no sensor, For a specified time determines how long the lights stay on after all turn-on sensors become inactive. The default is 5 minutes:
- Motion turns the lights on.
- Motion stops — the duration timer (For a specified time) starts.
- Motion returns — the timer is cancelled and the lights stay on.
- Motion stops again — the timer starts over.
- The timer expires — the lights return to their Default values.
Turn-on conditions
Tap Configure in the Automatic Turn On section to restrict when sensors can trigger lights — it opens the Limit page (pictured in Getting started). Outside the time window, and when the brightness is above the threshold, turn-on sensors behave as if they were inactive: further motion does not turn the lights on, and lights that a sensor turned on turn off when the duration timer (For a specified time) expires, even if the motion continues. Sensors in the Automatic Turn Off section are not restricted — while any of them is active, the lights stay on.
Time Condition for Motion Sensor
Motion sensor can only trigger lights in time interval... is checked by default, and the default window runs from On sunset to On sunrise. Each endpoint can use one of three modes:
| Mode | Description |
|---|---|
| Time | A specific hour and minute, in 15-minute steps |
| On sunrise | Relative to sunrise, with an offset from −4 to +4 hours |
| On sunset | Relative to sunset, with an offset from −4 to +4 hours |
A description below the slider shows the next actual sunrise or sunset time at your location. The start and end points cannot both use the same sun event; you can freely combine one sun event with a fixed time. At a location where the sun does not rise or set on a given day, the sensors do not turn the lights on.
Limit by Brightness Sensor
Tap Set brightness sensor to select a brightness sensor. Lights only turn on automatically when the ambient brightness is below the Brightness Is Less Than threshold:
- Percentage sensors — threshold from 0% to 100%
- Lux sensors — slider from 0 to 1000 lux in steps of 50 lux; you can enter a higher threshold as a number
When you select a sensor, the threshold is 30; if the app added the sensor when you created the smart rule from a device, it is 40. A live reading below the slider shows the current brightness value from the sensor. To prevent rapid toggling near the threshold, the brightness has to rise above it or drop below it by 2.5 percentage points; for lux sensors, by 2 lux at a low threshold, by about 50 lux at 1000 lux, and by at most 200 lux from 2000 lux up.
Place the sensor away from direct beams of the controlled lights to avoid feedback loops. When a controlled light brightens the sensor above the threshold, the smart rule behaves as if the turn-on sensor were inactive.
Automatic Turn Off
With a sensor in this section, the section decides when the lights turn off — for lights turned on by a sensor as well as with a button. The Presence signal of a presence sensor works best here: it remains active as long as someone is in the room — see Presence sensor.
Turn-off Delay
The lights switch off after specified time without detected presence. Note that the presence sensor itself includes an internal delay (default: 10 minutes). The delay is specified in minutes and seconds (default: 5 minutes) and starts when neither a turn-on nor a turn-off sensor is active:
- Motion turns the lights on.
- Motion stops, but Presence holds — the delay does not start.
- Presence stops — the Turn-off Delay starts.
- The person moves and both signals return — the delay is cancelled.
- Presence stops again — the delay starts over.
- The delay expires — the lights return to their Default values.
A light turned on with a button is in manual mode. When the delay expires, the smart rule switches it to automatic mode and the light returns to its Default values, but only after the override ends: if the delay expired during the override, this happens as soon as the override ends. With the Keep manual mode until ended by user option in manual override, the light remains in manual mode and stays on.
Presence sensor
The TapHome presence sensor, mounted on the ceiling, has two detectors: a PIR, which detects walking, and a radar, which also detects the small movements of a seated person. The module evaluates three signals from them and creates three devices for them in the app — Alarm, Motion and Presence. Motion and Presence belong in the Light Controller.
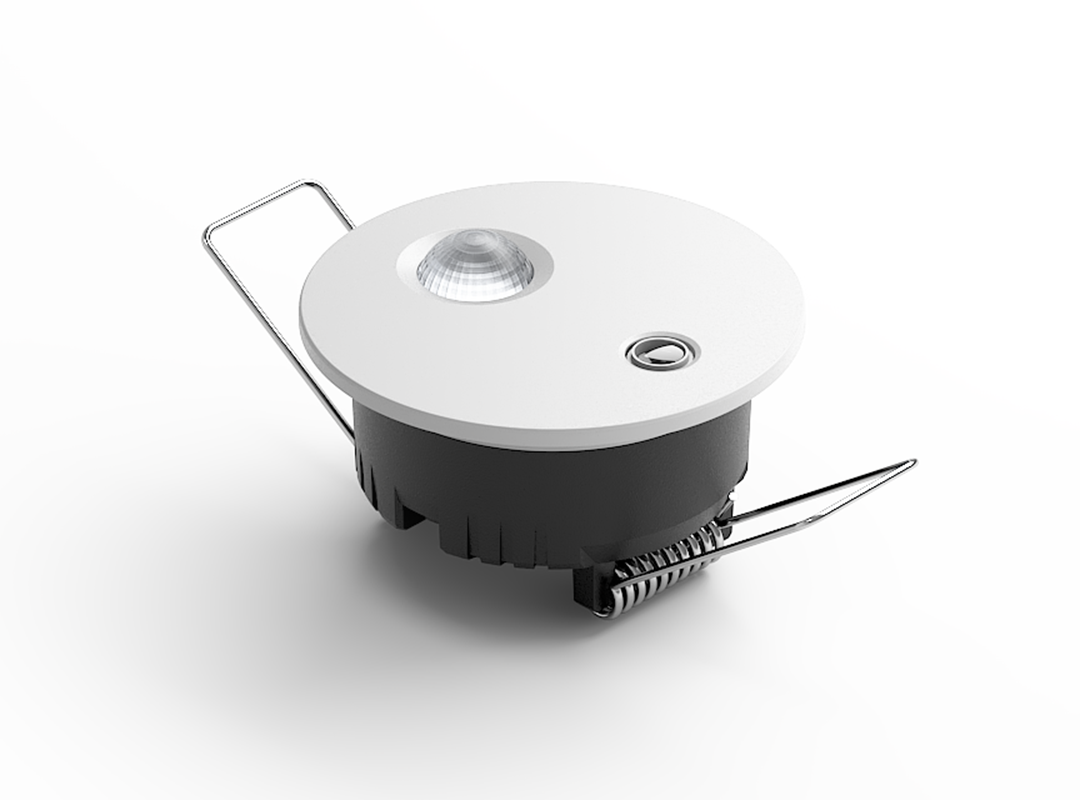
The Dual variant has both radar and PIR (Dual + CO₂ also measures CO₂), the Radar variant only radar. The detection angle is 120° for the radar and 125° for the PIR, and the brightness sensor measures 0–1000 lux.
Three signals
| Signal | Activated by | Kept active by | Hold time |
|---|---|---|---|
| Alarm | strong movement detected by both radar and PIR | strong movement on radar or PIR | 10 s |
| Motion | slight movement on radar or PIR | slight movement on radar or PIR | 10 s |
| Presence | strong movement detected by both radar and PIR | slight movement on radar or PIR | 10 minutes |
Each movement during the hold time restarts the hold time, and the signal goes inactive when no movement comes for the whole hold time. In the module settings, you can change the Status hold time of Presence (1 s to 10 hours); Alarm and Motion have a fixed 10 s. For each signal, the settings also include Radar sensitivity and PIR sensitivity (medium by default, low for the Alarm signal) and Trigger: Radar and PIR, Radar or PIR, Radar alone or PIR alone.
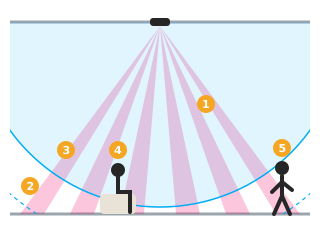
- The radar detects small movements close below the sensor — sitting, reading, writing.
- The radar also detects walking further from the sensor.
- The PIR senses along beams: it detects a person who crosses them; it may miss a seated person.
- Seated person — only the radar sees the small movements: Presence holds, Motion activates only now and then.
- Walking person — both radar and PIR see the strong movement: both Motion and Presence activate.
Motion and Presence in the Light Controller
Motion belongs in the Automatic Turn On section: it activates right at the first movement. Presence belongs in the Automatic Turn Off section: it keeps the light on while someone is sitting in the room. The light then turns off once the Presence hold time plus the Turn-off Delay has passed since the last movement — with the defaults of 10 minutes and 5 minutes, about 15 minutes after the person leaves.
Swapping them does not work:
- Presence in the Automatic Turn On section — only strong movement activates it, so the light turns on later or not at all, and after the person leaves, the light stays on for the 10 minutes of hold time; only then does the duration timer (For a specified time) start.
- Motion in the Automatic Turn Off section, when the turn-on section also has only Motion — while someone is sitting, the light turns off once 10 s plus the Turn-off Delay has passed since the last detected movement, and the next movement turns it back on.
The Radar variant has no PIR, so for signals whose trigger is Radar and PIR (Alarm and Presence by default), set Trigger to Radar in the module settings — otherwise, according to the firmware, they never activate.
Recommendations by room
The basis is Motion in the Automatic Turn On section and Presence in the Automatic Turn Off section. Rooms differ mainly in timing:
- Hallway, staircase — only Motion, no turn-off sensor, For a specified time 1–2 minutes. During the day, the default restriction from sunset to sunrise, or a brightness sensor, keeps the light off.
- Bathroom, toilet — Turn-off Delay 1 minute. In a room without a window, turn off the time window, otherwise the light does not turn on by itself during the day.
- Living room, study — Turn-off Delay 0–5 minutes. Add Motion only if the light should turn on by itself.
- Bedroom — Turn-off Delay 5 minutes. Leave out Motion or restrict it to the morning hours (mode Time): the default restriction covers the whole night, and movement in bed would turn the light on.
- Garage, storage room — Presence only if the sensor covers the whole space, otherwise For a specified time 5–10 minutes. Without a window, turn off the time window.
In the living room and bedroom, choose For a fixed time for the override after a manual turn-on, otherwise Presence does not turn off a light turned on with the switch. When the fixed time expires while a turn-on sensor is active, the lights change to the automatic turn-on brightness — a dimmed light jumps up.
Override automatic control with a button
Pressing a control button, or a custom button that has an action, temporarily suppresses automatic sensor behavior: while the override lasts, the sensors neither turn the lights on nor turn them off. Tap Override Automatic Control With a Button in the Settings section to open a page with two parts.
When light is turned on with a button
The “When light is turned on with a button, override automatic control…” part:
- Until turned off with a button (default) — override lasts until you press a button to turn the lights off, and then for the time from the other part.
- For a fixed time — override lasts for a specific duration, from 1 second (the app presets 5 minutes).
When light is turned off with a button
The “When light is turned off with a button, override automatic control…” part:
- Until turned on with a button
- For a fixed time (default, 1 minute).
At least one of the two overrides must use For a fixed time, otherwise neither override could ever expire; the app switches the other part by itself. The direction of the press counts, not the state of the light: a hold that lowers counts as a turn-off even if the light stays on, and after the time from the other part, the sensors take over the light. For a hold, the override time counts from the button release. The chart shows the default options:
- A short press turns the lights on and starts an override with no time limit.
- Motion during the override is ignored.
- A short press turns the lights off; the override lasts 1 more minute.
- Motion is ignored, the lights stay off.
- The override ends while motion continues — the sensor turns the lights on immediately.
How the logic works
Evaluation order
On every change of a sensor or button, the smart rule processes events in a fixed order: brightness sensor, control buttons, custom buttons, automatic turn-on, automatic turn-off. Button actions therefore take priority — a button press suppresses the sensors before they are evaluated.
Push button override interaction
During an override, the duration timer (For a specified time) is cancelled, while the Turn-off Delay keeps counting down. Motion that both started and ended during the override is not counted — without a turn-off sensor, lights turned on with a button stay on even after the override ends.