
Akuvox
Configuration instructions for integrating an Akuvox R20A video doorbell with the TapHome home automation system, including SIP account configuration, RTSP streaming, and HTTP API setup.
Overview
This documentation covers configuring an Akuvox R20A video doorbell with TapHome home automation system.
Device Setup (Akuvox Web Interface)
The factory login is admin / admin. Newer firmware makes you replace that password at the first login and shows its own complexity rule on screen. Whatever you set here, it changes only the web login — the RTSP and HTTP API credentials stay as they were; see Intercom - Relay Settings below.
Menu paths moved between firmware generations, so this page names both where they differ. Open Status and read Model, Firmware Version and Hardware Version before you start. Two different digits of the firmware version matter, and they answer different questions: the first is the hardware generation (20.x, 220.x, 320.x) and decides which menu layout you see, while the third decides whether the unit has High Security Mode at all (10 or higher). If a setting named on this page is not where it says, you are on the other generation.
Intercom - Basic Settings
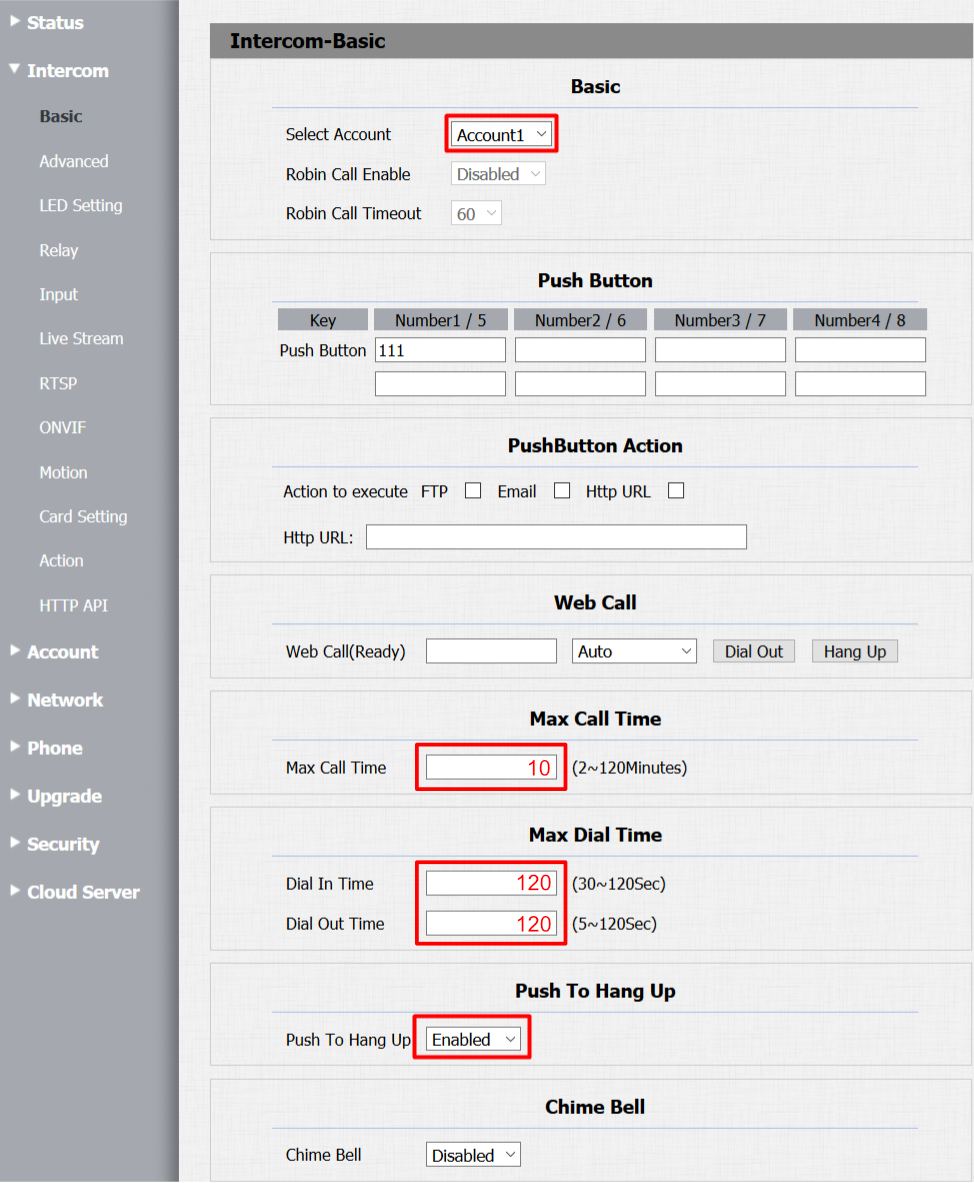
- Set Push Button key number to 111
- Set Max Call Time to 10 minutes (Intercom > Call Feature > Max SIP/IP Call Time on newer firmware). TapHome Core ends a call on its side after 10 minutes, so a shorter value only cuts calls early.
- Enable “Push To Hang Up” for immediate call termination
Intercom - Relay Settings
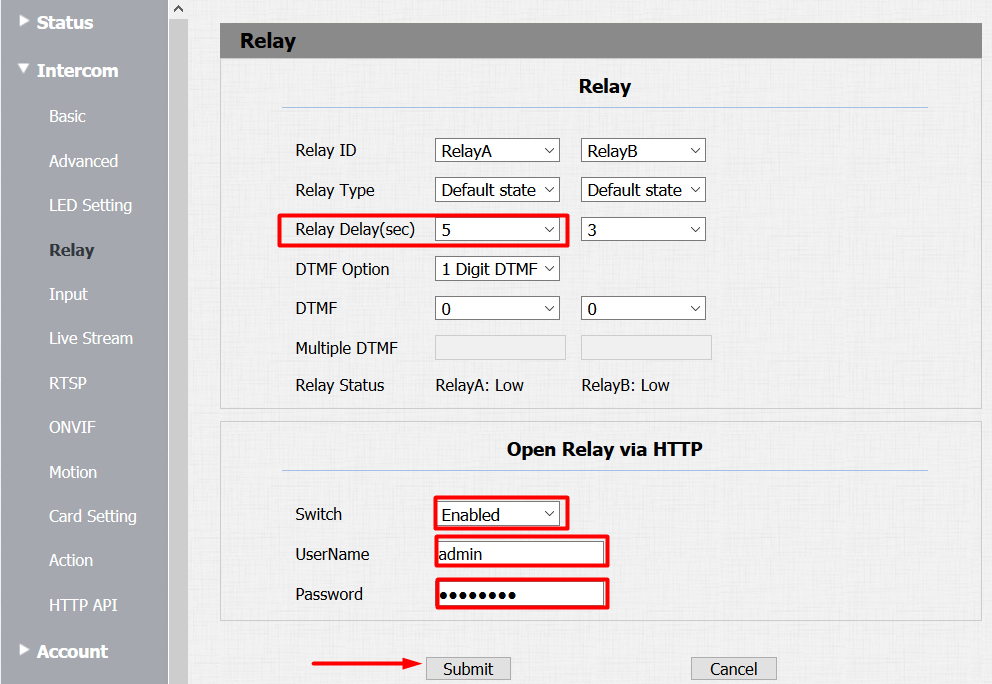
- Set Relay Delay in seconds (matching TapHome HTTP switch settings)
- Enable Packet parser for door switch control
- Under “Open Relay via HTTP”, enable the switch and set the HTTP API user name to “admin” and a password
- The doorbell keeps three independent sets of credentials, and TapHome stores only one pair. Changing the web password does not change the other two, so for TapHome to work end to end all three must carry the same user name and password:
- web interface login — Security > Basic
- RTSP user name and password — Intercom > RTSP (Surveillance > RTSP > RTSP Basic on newer firmware); this is what guards the snapshot and the video stream
- HTTP API user name and password — Intercom > Relay, section “Open Relay via HTTP” (Access Control > Relay on newer firmware); this is what opens the door
- A mismatch is invisible in the TapHome app — the field is filled in, just for a different service. The usual symptom is a working call with no camera image, or a camera image with no door opening.
Intercom - RTSP Configuration
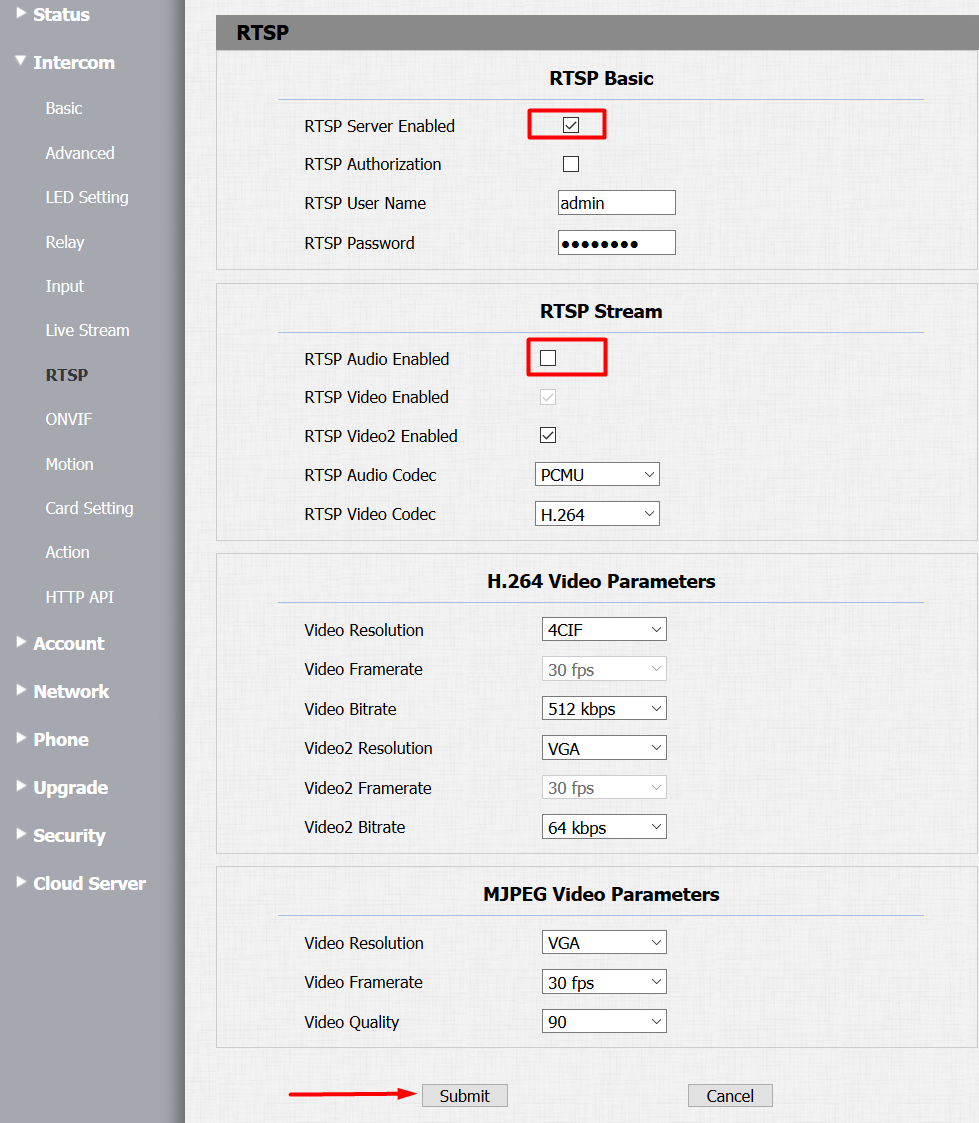
- Enable RTSP Server
- Disable RTSP Audio (transmitted via SIP instead)
- Note the RTSP User Name and RTSP Password on this page — they are not the web login. They guard both the RTSP stream and the snapshot, and they must match what you enter in TapHome.
- Newer firmware adds a separate “MJPEG Authorization” switch here. It is on by default and it is checked against the RTSP credentials, so a mismatch shows up as a missing camera image while the call itself works.
Intercom - HTTP API
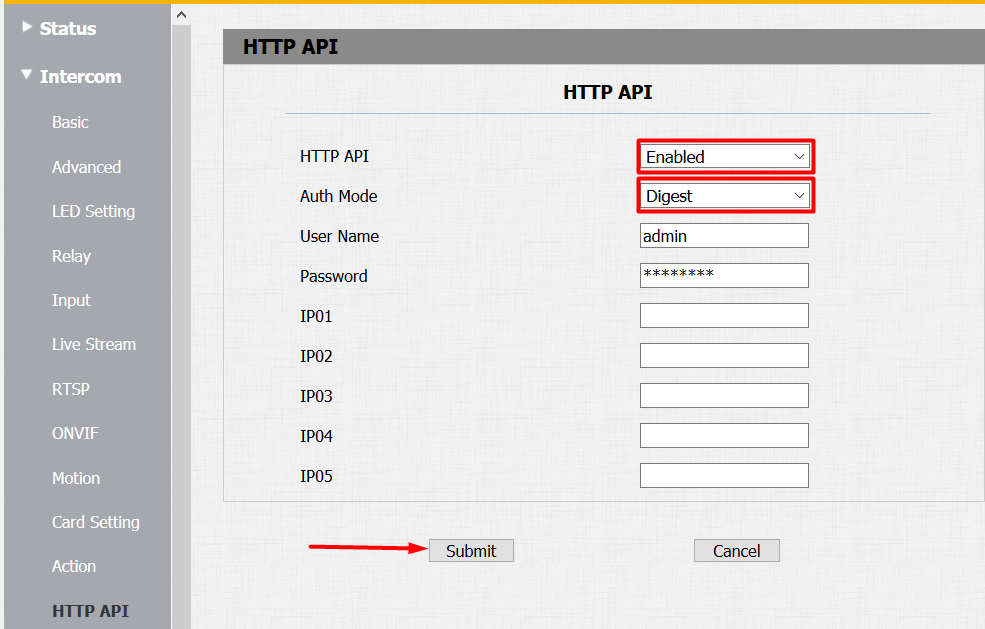
- Enable Packet parser
- Set Auth Mode to Digest
Account - Basic Settings
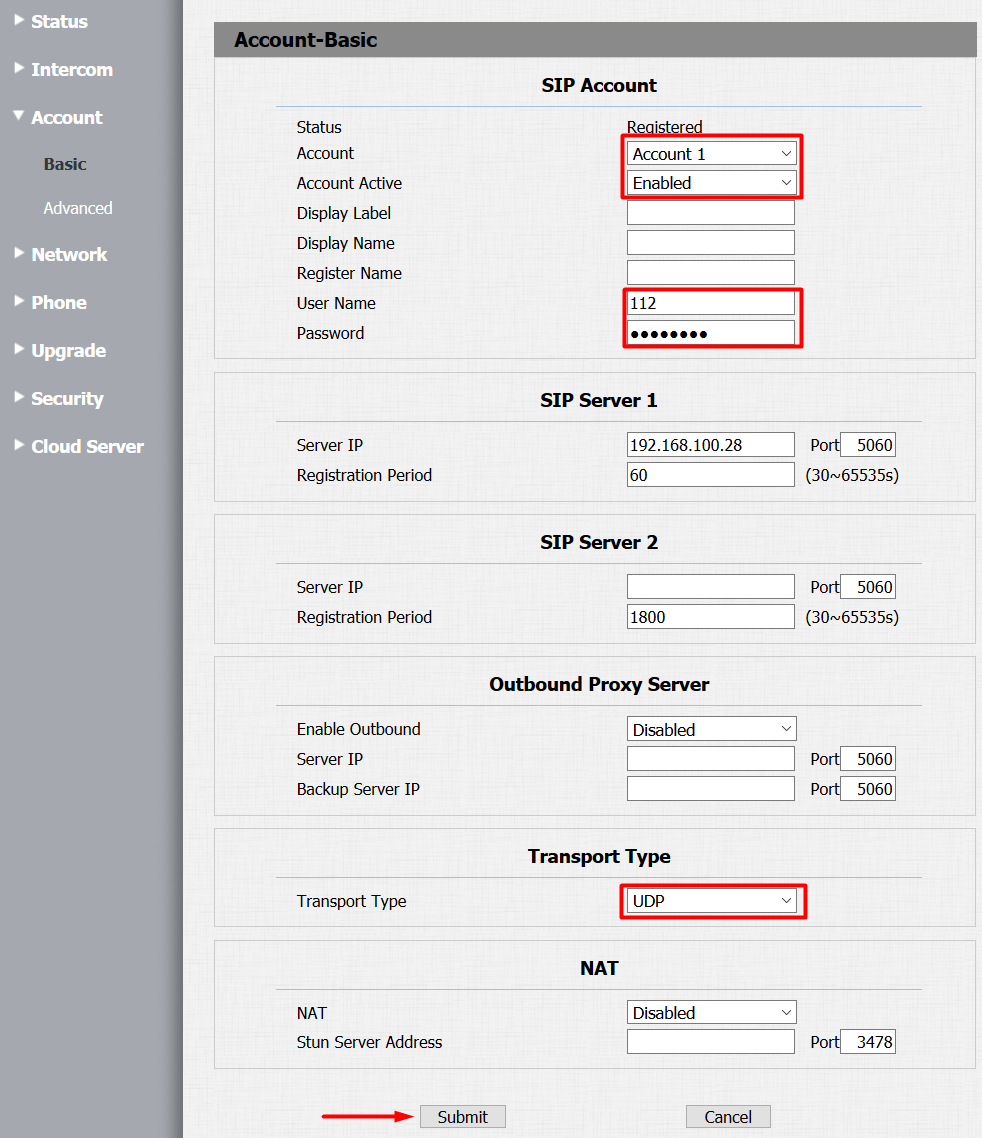
- Select Account 1 and enable it
- Set User Name to 112
- Configure SIP Server 1 to TapHome Core IP address, port 5060
- Use static IP addresses for both devices and doorbell
- Set Transport Type to UDP
- Status should show “Registered” when configured correctly. The doorbell registers to TapHome, so the IP Camera & Door bell (SIP) interface must already exist in TapHome — until it does, the doorbell shows “Registration Failed”.
Account - Advanced Settings
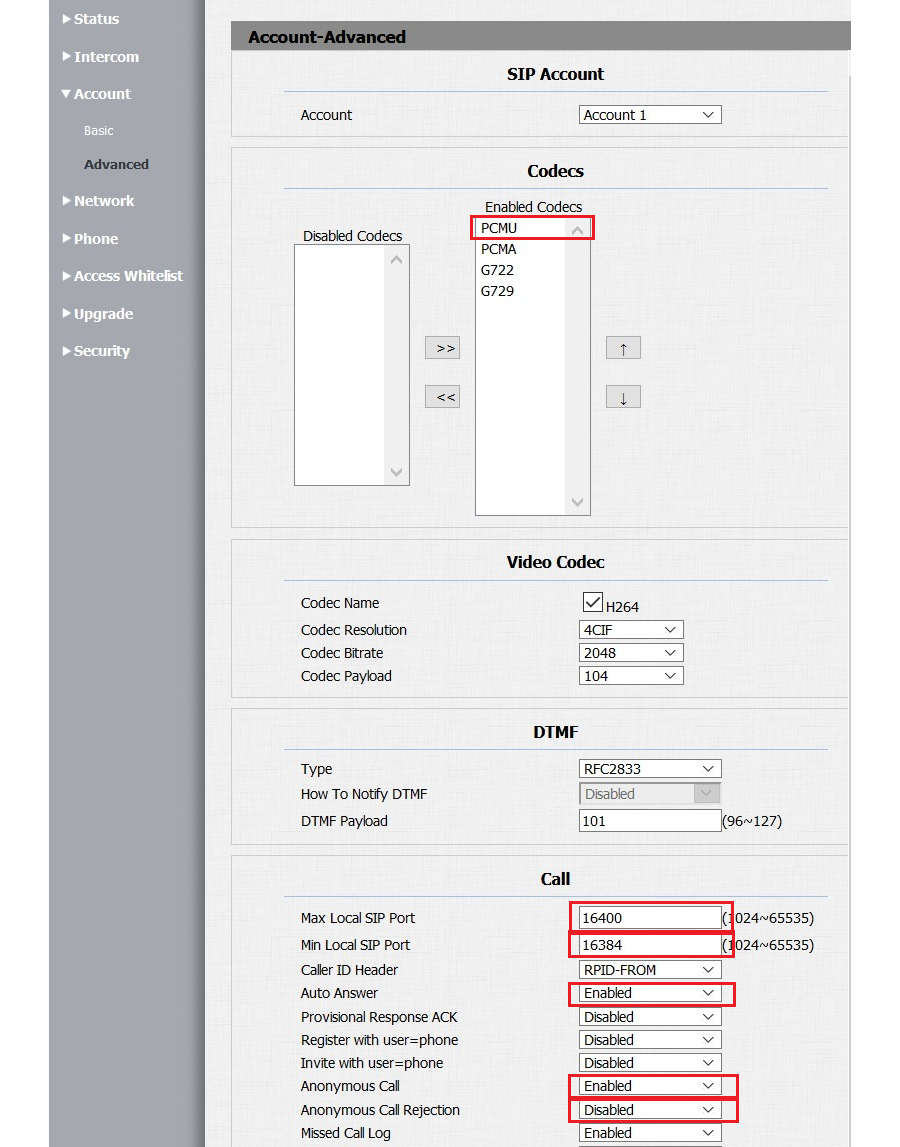
- Enable PCMU audio codec
- Enable Auto Answer
- Enable Anonymous Call with rejection disabled (firmware 320.30.11.63 does not show these fields — skip them there)
- Set SIP port range: minimum 16384, maximum 16400
Network Configuration
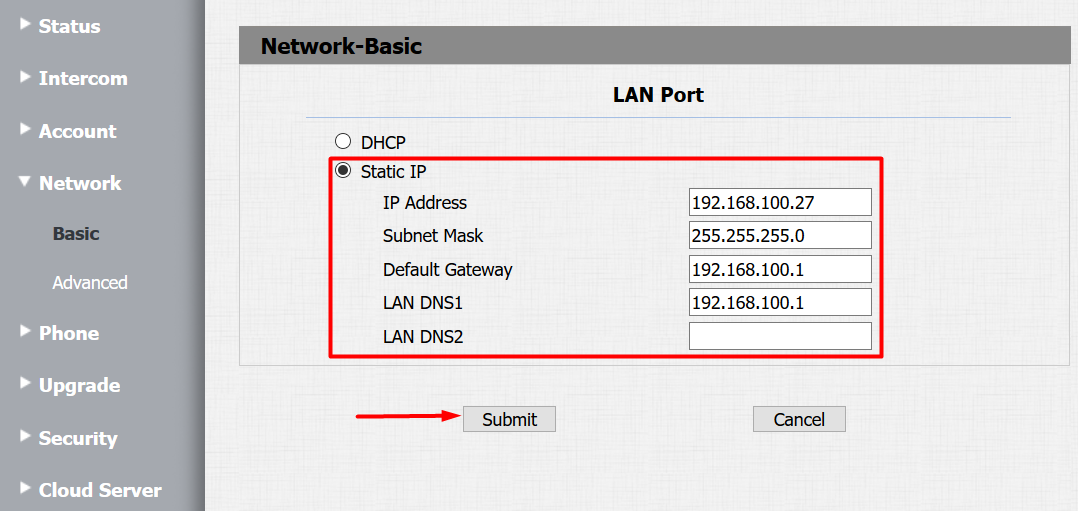
- Change from DHCP to Static IP mode for stability
- Keep Allow HTTP on and turn Allow HTTPs off (Network > Advanced > Web Server on newer firmware). TapHome talks to the doorbell over plain HTTP only. With Allow HTTPs on, firmware 320.30.11.63 answers even plain HTTP requests, on port 80 and on port 8080, with a redirect to HTTPS, and TapHome does not follow that redirect — the camera image and the door opening from TapHome can then fail without any error in the app. Quick check: open
http://<doorbell IP>/in a browser; if the address changes tohttps://, Allow HTTPs is on. We measured the redirect on firmware 320.30.11.63; a unit on 320.30.10.136 did not redirect. TapHome never uses HTTPS towards the doorbell, so it never needs Allow HTTPs.
Phone - Call Features
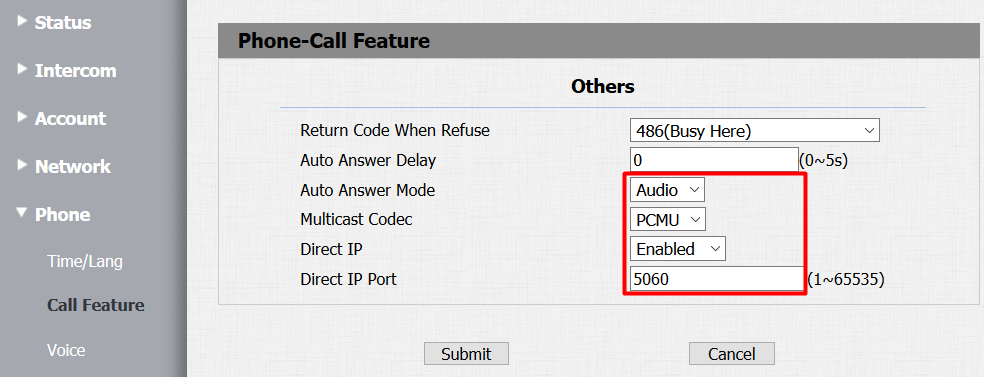
- Set Auto Answer Mode to Audio
- Set Multicast Codec to PCMU
- Enable Direct IP with port 5060
Phone - Voice Settings
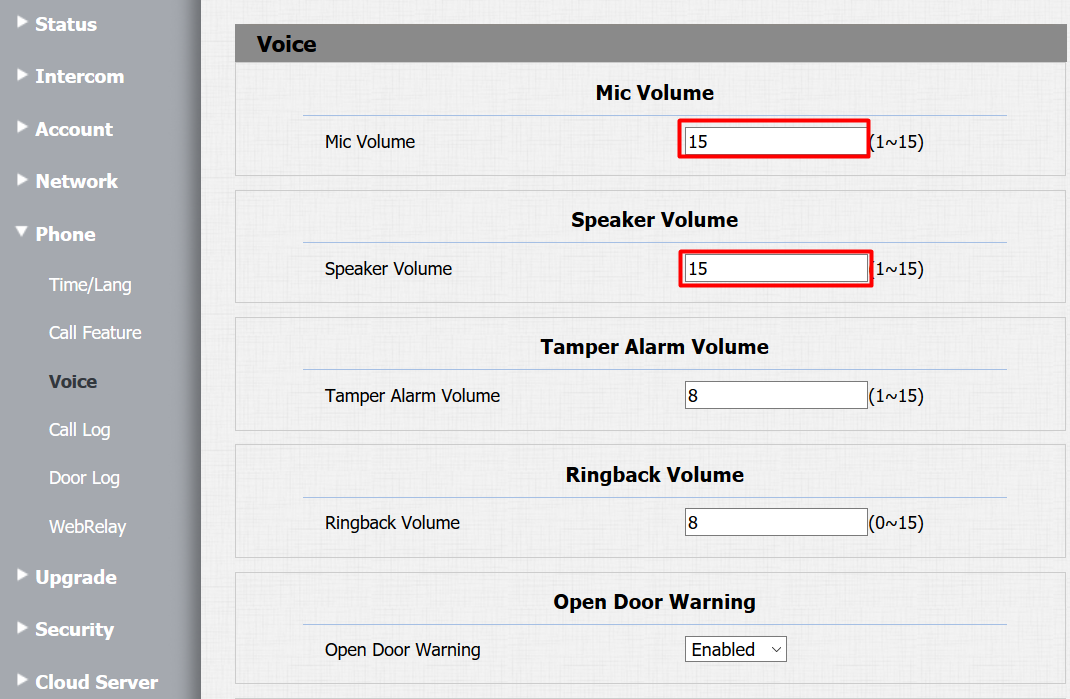
- Adjust Mic and Speaker Volume (recommended: volume 15 for speaker)
TapHome App Configuration
Video Stream Settings
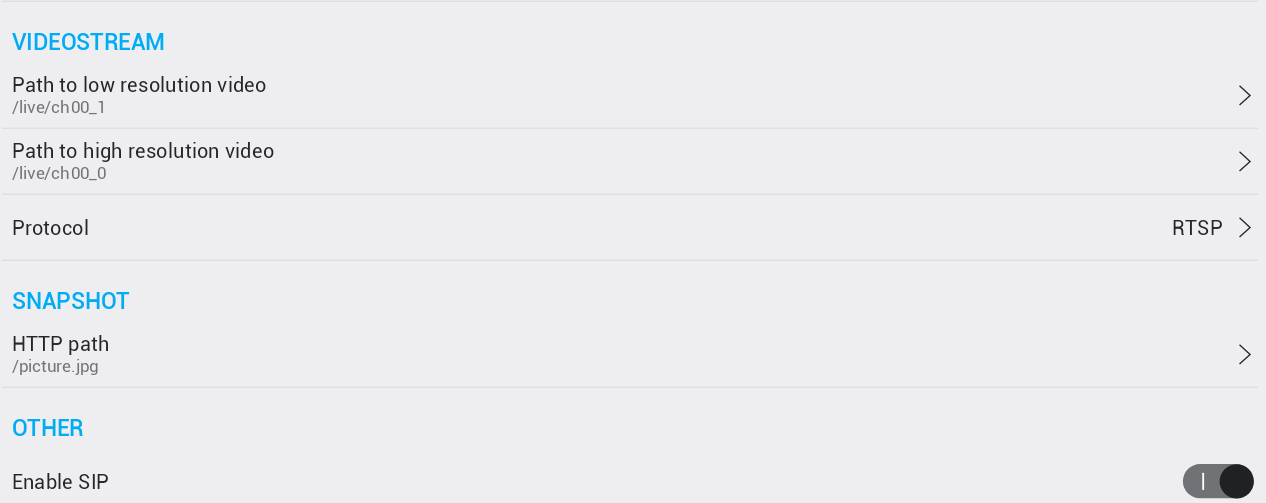
- Low resolution:
/live/ch00_1— second channel, 640×480 - High resolution:
/live/ch00_0— first channel, 1280×720 - Snapshot path:
/picture.jpg— the doorbell serves it from its MJPEG server on port 8080, not on the web interface port, so TapHome has to be pointed at that port too. Ports are set under Local network settings, see Configuration in TapHome; the snapshot port is a separate value from the HTTP port. - Enable SIP
HTTP Switch Parameters
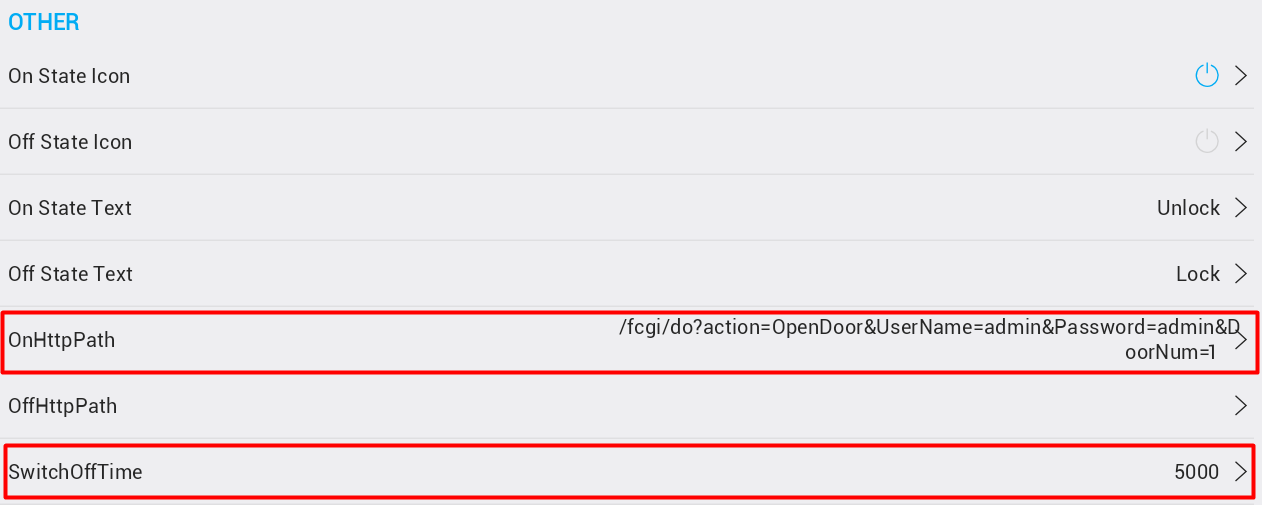
- Set OnHttpPath to:
"/fcgi/do?action=OpenDoor&UserName=admin&Password=xxxx&DoorNum=1"— use the HTTP API password you set under Intercom - Relay Settings above - This form only works while High Security Mode is off on the doorbell. Units that have it on reject it, and Akuvox then accepts only
"/fcgi/OpenDoor?action=OpenDoor&DoorNum=1"with the credentials sent as HTTP authentication rather than in the path. We have not confirmed that the TapHome HTTP switch can send that variant, so do not rely on it: turn High Security Mode off and use the form above. The switch is at Security > Basic on older firmware and System > Security on newer. - High Security Mode only exists on firmware whose third number is 10 or higher, for example
320.30.10.136— on anything below that the switch is simply not in the menu, and the form above is the only one the doorbell knows. Units shipping with newer firmware may arrive with it on. - If the camera image works but the door does not open, this switch is the first thing to check.
- Switch Off Time must match device Relay Delay value (in milliseconds)